|
Rejetting the Carburetors on a GS500.
By Jeffrey D. - And many GsTwin.com members.
The first thing you should do is find out what size jets you need to install. If everything is stock then you will
need 40 pilots, and 125 mains, and one washer to raise the needle, also the idle air screw out 3 turns. Other than that
you will need to ask around to determine what size you need. The jets should cost ~$2.50 Brand New and the washer is a #4
washer (stainless steel or Brass) which you have to go to a hardware store to get, Just ask for a #4 washer (theyre pretty
small) $0.07 apiece.
Approximate time for someone who has torn apart the bike before. 2hrs
NOOB time. 3-4hrs.
Read the directions all the way through a few times to get a feel for what you have to do before you get stuck.
Jump to step 8 if you know how to remove the carbs.
- Remove the seat.
- Remove the plastic sides of the seat. Two bolts that bolt to the frame and then the two screws holding on the piece under
the rear grab bar.
- Remove the two bolts holding on the tank. Slide the tank back a little bit so the front hook is not under the frame anymore
and tilt the tank back and use a Flat head screwdriver to turn off the petcock under the tank. You need to come from the right
side of the tank almost all the way to the other side. Just a note having the slot facing with the direction of the tubes
is on, perpendicular is off.
- Remove the 2 hoses from the tank (be careful they are filled with fuel), there is also a drain hose attatched to
the tank towards the back, you can either remove this or just pull it out along with the tank (not critical). now grab
under the rear of the tank and the nose and place the tank in a safe spot. Be careful to make sure that the tank petcock does
not get damaged when you put the tank somewhere. I propped mine up against a toolbox so the front end was off the ground.
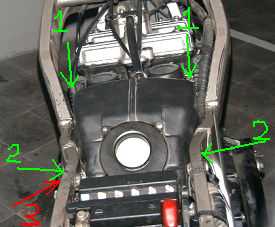
- I found it easier to remove the airbox without the fuel valve in the frame. So take a socket and remove the bolt holding
the fuel valve and just let it hang in the frame. Now there are two screws holding the airbox in the frame which are just
underneath the frame at the rear of the airbox. With those screws out you now need to loosen the clamps holding the airbox
to the Carb. It is basically a big hose clamp sealing the airbox to the carb, loosen those clamps almost all the way off then
pull the airbox toward the battery until you feel/see it come off of the carburetors, then lift it up and out.
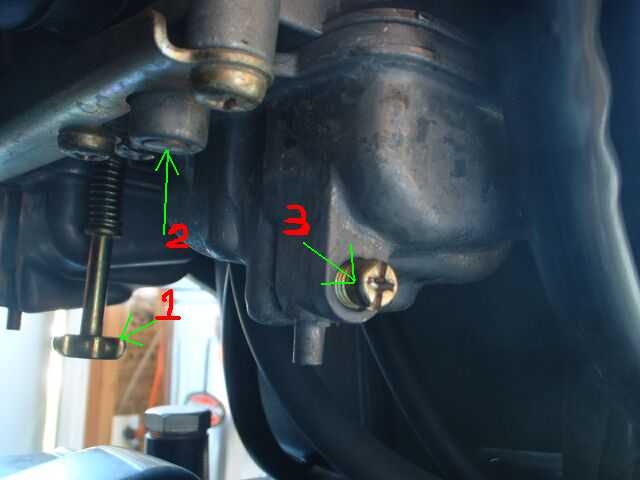
- Now would be a good time to drain each carb also. (little screw on each carb facing out with a little hole underneath,
dispose of fuel that comes out of the carbs) Now remove the Vacuum hose from the Fuel Valve (I found this easier than removing
it from the carbs) then disconnect the throttle cable (middle of the carbs) and the Choke cable (right side of the carbs),
The drain tube (top center of the carbs) and then finally the fuel line (bottom center of carbs).
- Everything should now be disconnected from the carbs except the vacuum hose. Now there are 2 more hose clamps holding
the carbs to the intake manifolds. Loosen those two clamps almost 100% just like before and slowly pull the carbs toward the
battery until it comes off.
- First lets install the washer. With the carbs oriented the way they were mounted on the bike you should see two big black
plastic caps, One on each carb. Take a screw driver and remove the screws holding one cap on (do the carbs one side at a time),
slowly lift the cap off the carb. Make sure you dont lose any orings seals or anything. Now there should be a spring attached
to the cap. Now you might be able to get the needle out by tipping the carb upside down, if not slowly work up the little
rubber diaphragm and pull the slide out. You are trying to get at the long brass needle in the center. Now with the needle
in your hand pop off the little C clip and the washer goes underneath that, so you might have to push down the plastic doughnut
that was under the C clip. Basically work with it until you have the needle with the plastic doughnut, #4 washer, C clip.
Then reinstall everything and do the same to the other side.
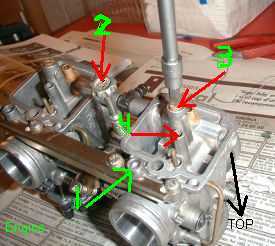
- Now the main/pilot jets. After you have finished the top of the carbs flip them over so your now looking at the bottom.
Each float bowl has 2 screws holding it on, Remove the 2 screws and pull off the float, make sure you dont damage any seals.
Now you will see the float (big orange structure) and the float needle (small brass piece that looks like a midget pencil).
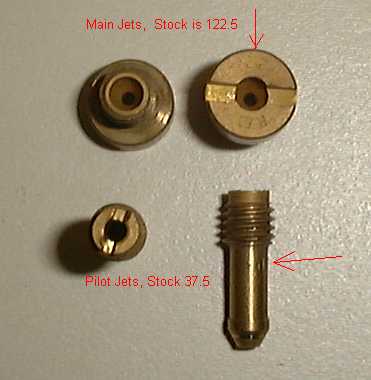
Grab the float and pull it straight up and set it on your workbench trying to keep it exactly as it came out. Now looking
back at the carb you will see the main jet (see photo) just unscrew it with a flathead and install the new one. Now look in
close vicinity to the main jet you should see a small hole with the pilot jet (see photo) just do the same thing as above.
- Lastly the Idle air screw. This is hidden behind a brass plug that needs to be drilled out. Carefully use
a small drill bit in the center of the plug to make a small hole. After you have a small hole take a drywall screw or
something similar and thread it into the hole and pull out the plug. Seat the screw all the way down then back it out
3 complete turns.
- I suggest installing an Inline filter while you have the fuel system apart. Go buy an inline filter for like $2.50 and
just splice it into the fuel line that goes to the bottom T of the carburetors (note the direction of the arrow on the filter).
- Finally put everything back the way it was before. Set idle to 1,200 and enjoy a Linear torque curve!!!
*A note on reassembly- Alternatively when
reinstalling the carburators mount the carbs into the aribox so you do not have to fiddle with trying to seal the airbox onto
the carbs while in the frame. - Thanks to Lars from GSTWIN.com
|